How to Install a Chandelier of Any Size and Type by Yourself
Not sure how to install a chandelier?
We’ll take you through the step-by-step process of installing one.
First, you need to understand that installing a chandelier on your own is only sensible if you know how to assemble light fixtures and can handle electrical components.
If you’re someone who hasn’t changed a single bulb in your life, think twice before you install the chandelier by yourself. You could either damage the chandelier or experience an electrical shock.
Still, installing a chandelier doesn’t always require professional expertise. If you’re hanging it in locations that are easy to reach and know how to work with a screwdriver and electrical wires, you’re good to install one.
But how do you install a chandelier by yourself?
Be it of any type, chandeliers are hung in the same manner. If your home already has a chandelier, the task can be as superficial as removing the old one and mounting the new one on the existing wiring system.
But before we talk about how you can install a chandelier, let’s discuss how you can remove one and some other essentials.
First things first — you’ll need the following tools to install a chandelier:
- Flathead screwdriver
- Needle-nose plier
- Wire stripper
- Wire tester
- Electrical tape
- Step ladder
- And of course, the light fixture
How to Safely Remove the Old Chandelier
Removing an old chandelier isn’t a one-man job. You’ll need someone to assist you, especially when you’re removing a gigantic chandelier. These priceless pieces require careful removal.
It’s always recommended to have someone by your side in case things go wrong.
Before you remove the old chandelier, make sure you follow all the necessary safety measures, including switching off the main electrical supply and testing the electric current afterward.
When you’re safe to move forward, use the following process to remove the old chandelier:
Turn off the electrical supply to the chandelier in your breaker panel
Make sure that the area under the chandelier doesn’t have any objects
Use a step ladder under the chandelier to reach it comfortably
Locate the chandelier’s escutcheon which is connected to the ceiling
Remove the screws which attach the escutcheon to the roof
When you lower the escutcheon, make sure you keep holding the chandelier
Use a circuit tester to ensure that the chandelier’s wires aren’t live
Unscrew the nuts connecting chandelier’s wires to the main power supply and separate the cables
Many times the ground wire is physically screwed to the junction box, unscrew it
Remove the screws which mount the chandelier on the junction box
Take help from your assistant to hold the chandelier so that it doesn’t fall
Safely remove the chandelier
Now you’re ready to install the new one.Recommended Hanging Height for Chandeliers

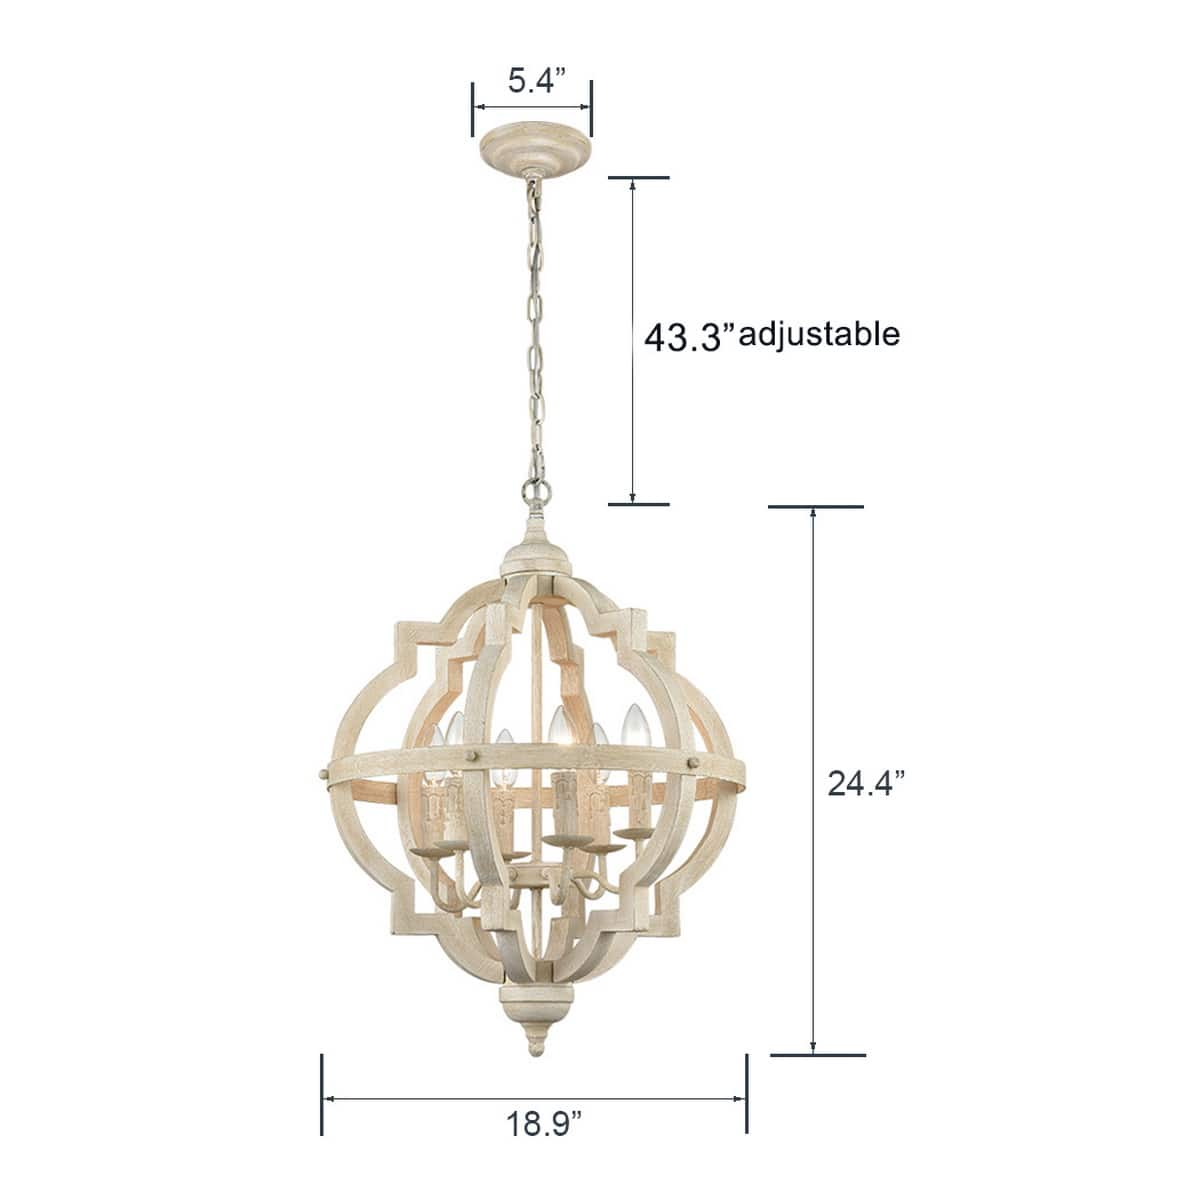
Before you install your new chandelier, it’s important to figure out the height for it. The height of your chandelier heavily influences its functionality as a lighting fixture as well as a decorative piece in your room.
But how do you decide the height of a chandelier?
The standard height of a chandelier for an eight-foot ceiling is between 30 to 35 inches over the table. For ceilings higher than 8 feet, you can mount the chandelier 3 inches higher for each additional foot.
However, the height recommendation for chandeliers cannot be hard and fast. Based on the room and table size and your preferred level of illumination in the room, you can adjust a few inches.
When you install the chandelier, make sure that it not only looks good but also functions as a helpful light source.
There might be a case where the chandelier looks great at a particular height but doesn’t illuminate the room. If you don’t want to lower the chandelier, consider changing the light bulbs, it might help.
Required Hanging Hardware for Chandeliers
Based on the type of ceiling and existing fixtures, you can either use a pancake-styled electrical box or a fan brace to install a chandelier.
Let’s discuss both options.
1. Hanging on a Pancake-Style Electrical Box
You can mount a shallow pancake-styled electrical box to the ceiling joist to hang your chandelier elegantly. It looks aesthetically good and can even hold heavy and large chandeliers.
The most common mistake people do while mounting the pancake electrical box is to use old screws. It is always recommended to use the screws that are provided in the box.
Also, you should use a black-colored plastic cable connector to protect the electric cables from the sharp edges of the pancake box.
What’s next?
Hold your new chandelier’s canopy against your ceiling and see whether there is any gap between the canopy and the electrical box hole.
If the chandelier’s canopy cannot cover the hole from your old electrical box then you should either cover the area with some decoration or patch the ceiling.
2. Use a Fan Brace
As the name suggests, the fan brace is created to hold ceiling fans. However, it can also be used for chandeliers. If it’s installed well, a fan brace can hold chandeliers of up to 150 pounds — pretty neat for small chandeliers, right?
The best part here is that they can be mounted without having to do anything to your ceiling. You can simply remove your existing lighting fixture, take your electrical box out, and fix the fan brace.
Okay, so we’ve talked about the basics of installing a chandelier.
Let’s get to the crux of this guide and take you through the process of how you can install a chandelier.
How to Install a Chandelier - General DIY Process
You can install a chandelier by yourself, and the only cost you’ll incur is that of the light fixture. Isn’t it awesome?
Following is how you can install a chandelier.
1. Turn Off the Power
Working with electrical power can be hazardous, especially when you don’t have professional knowledge in this field.
Therefore, same as doing any electrical work on your own, it’s safe to turn the power off before you install your chandelier.
You don’t have to cut the entire power of your house. Just go to your electrical panel and turn off the power to the room you’re installing a chandelier in.
2. Prepare the Electrical Box
We’ve already talked about the hanging hardware on the ceiling. Irrespective of the type you’ve picked, it’ll have a wiring system.
Don’t forget to check the joist or wood block for weight support. It should be rated to hold your chandelier’s weight.
But, how do you prepare the electric box to install a chandelier?
To prepare the electrical box to install the chandelier, remove the existing ceiling fan or light fixture (if you have any). Also, make sure that the ceiling box is safely attached to the ceiling with the original screws.
Expert Tip: If you aren’t sure about the wiring stuff, it’s worth hiring a professional.
3. Assemble the Chandelier

If you’ve ordered a chandelier online, it’ll probably be delivered in disassembled parts.
Be it any purchase medium; the chandelier box will contain the manufacturer’s guidelines for putting its parts together.
Make sure that you clean all the glass and metal pieces for fingerprints and assemble the beauty.
4. Measure the Chain/Cord/Rod’s Length

You should determine the length of your hanging piece (chain, cord, or rod) as per the hanging height of your chandelier from the table or floor and also the location like the hallway.
The best way to do this is to detach the hanging piece from the chandelier and place it in the electrical box.
But how?
Ask someone to grab the assembled chandelier and hold it near the hanging piece with the intention of judging its required length.
Make sure you keep a buffer of a few inches while cutting the hanging piece so that you can make adjustments after you install the chandelier.
While there is more to the length of the hanging piece, let’s stay at the heart of this guide - how to install a chandelier. We’ll talk about the hanging piece length in the upcoming sections.
5. Attach the Chandelier to the Ceiling Box
This is the most critical part of the process of installing a chandelier.
How to do it effectively?
While there are several ways of attaching the chandelier to the ceiling box, you should go with the following one.
Attach the chandelier’s mounting bracket to the ceiling box with screws. Insert the chandelier’s hook into the bracket.
The next thing you need to do for the connection is to take the bare copper wire, which is your ground, and wrap that around the green screw on the chandelier’s mount.
6. Connect Wires for Electricity Supply
Wires are usually color-coded. It’s pretty standard.
White/black wire - neutral
Yellow wire - power/hot wire (it can be colored in purple, blue, red, and black color)
Green wire - ground/earth wireThe wires should correspond with the chandelier’s wires.
In order to make the connection, first, check the wire’s condition. If your electrical fittings have become old, the supply wires might be frayed. Use a wire stripper to trim down the damaged ends and uncover the insulation.
Then, connect the open end of the hot wire to the black wire of the chandelier. The color code of the chandelier’s wires might differ. Therefore, cross-check the wire guidelines in the chandelier’s installation instructions.
Connect the neutral wire (white/black one) to the other wire of the chandelier. When done, wrap the stripped ends of the wires with wire nuts and electrical tape and place them safely in the electric box and cover the electric box with the chandelier’s decorative plate.
7. Screw-In Bulbs & Turn On Power

Whether you’ve bought a crystal chandelier or a candelabra chandelier, the light bulbs you use will determine the ambiance they’ll create.
But how to choose the right bulbs?
Generally, chandeliers have three bulb options - halogen, incandescent, and LED.
Halogen bulbs deliver clear and bright light that sparkles your chandelier’s glass or crystals. In contrast, incandescent bulbs produce a warm glow.
LED bulbs, on the other hand, are the most durable and feasible alternatives. They’re very common in modern chandelier designs.
The reason being they produce a glow very similar to incandescent bulbs and have a longer lifespan. On top of all, they're energy-efficient.
One thing you need to remember is to check the chandelier for the bulb voltage guidelines while choosing a chandelier for you.
But how do you install the bulbs to the chandelier? Is it like screwing in a regular bulb?
Yes, you can install the bulbs in the chandelier just like you screw in a regular bulb. Once done, restore the power to the room from the electrical panel.
What we’ve discussed so far are the general instructions to install a chandelier. Depending on your chandelier type and size, the steps can be slightly different.
Here are the installation tips for several common types of chandeliers.
Installing a Chain-Hung Chandelier

The best thing about installing a chain-hung chandelier is that you can easily adjust its height. You just need to remove the additional chain links to hang them at your preferred height.
To determine the desired hanging height for your chain-hung chandelier, just lay the chain and lamp on the ground and measure their combined length. Cut down the excess chains using a plier.
Also, hiding the wire is essential to maintain the chandelier’s aesthetics.
And how do you do this?
To hide the wire, just wave the lamp’s wires through the chain links. The wires need to be approx. eight inches longer than your chain.
The rest of the installation process for chain-hung chandeliers is similar to the general instructions we had discussed earlier.
Installing a Rod-Hung Chandelier
A rod-hung chandelier is perfect for rooms with higher ceilings as a rod looks aesthetically elegant and modern.
Unlike chains, the electrical wires go through the rod so that they aren’t exposed. To install this type of chandelier, you’ve got to place its mounting strap over the electrical box and screw it with the given supplies.
When done, make sure that you keep the wire length approx. eight inches longer than the rod so that you can make the wire connection easily.
One thing to remember here is that rod chandeliers are usually rigid in terms of length, unlike chain-hung chandeliers.
FAQs
1. Do I need an electrician to install a chandelier?
Installing a chandelier on your own is only sensible if you know how to assemble light fixtures and can handle electrical components.
If you’re someone who hasn’t changed a single bulb in your life, think twice before installing the chandelier by yourself. You could either damage the chandelier or experience an electrical shock.
2. Is it easy to install a chandelier?
Installing a chandelier doesn’t necessarily require professional expertise. If you’re hanging it in locations that are easy to reach and know how to work with a screwdriver and electrical wires, you’re good to install one.
Chandeliers are hung in the same manner. If your home already has a chandelier, the task can be as superficial as removing the old one and mounting the new one on the existing wiring system.
3. How much does it cost to install a chandelier?
The cost to install a chandelier depends on whether you’re doing it yourself or hiring a professional to do it.
If you hire a professional to install the chandelier, it should cost you between $110 - $250, depending on the complexity of installation. However, if you’re installing the chandelier by yourself, the cost will only contain the cost of the light fixtures.
4. How to install a chandelier with ease?
Installing a chandelier is quite easy if you follow the right process.
Here’s how you can install a chandelier:
Turn off the power of your room
Prepare the electrical box for the chandelier mount
Assemble the chandelier pieces to make it wholesome
Measure the length of your chain/cord/rod
Attach it to ceiling box
Connect wires for electricity supply
Screw-in bulbs
Turn on the power supply from the electrical panel5. How to remove an existing chandelier?
Turn off the electrical supply to the chandelier
Use a step ladder to reach it comfortably
Locate the chandelier’s escutcheon, which is connected to the ceiling joist
Remove the screws that attach the escutcheon to the ceiling joist
Unscrew the plastic wire connectors attaching the chandelier’s wires to the main power supply and separate the wires
Many times the bare copper ground wire is physically screwed to the junction box; unscrew it
Remove the screws that mount the chandelier to the junction boxConclusion
As you’ve seen, it isn't a difficult task to install a chandelier if you know a little bit about fitting and light fixtures.
If you’ve purchased a chandelier and decided to install it by yourself, don’t forget to follow the safety measures because working with light fixtures and electrical wires can be deadly.
And if you’re looking to buy a new chandelier for your home, check out Claxy for the best collection of chandeliers.